How to Stop Invalid Clicks on Google Adsense Ads (WordPress)
If you are Blogger then you must Know About Google Adsense. Google Adsense is Program which Grants you to Show Ads on your Website, Application. Whenever Someone comes to your Website or Blog Clicks on your Ads your Get Paid.
That Looks Very Easy like a Sweet Although Google Adsense is very Strict for Invalid Click Action on your Google Adsense Account.
But you may not know that How to Stop Invalid Clicks from your Google Adsense. If your Blog is on WordPress then there is very Easy way to Stop invalid Click From Your Google Adsense Account.
How to Stop Invalid Clicks on Google Adsense Ads (WordPress)
Step Numer 1=>
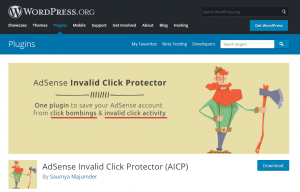
In Step 1, You will Need to Visit WordPress.Org, Once If you have Visited WordPress.Org then I Will Recommend You to go for Plugins. In Search Bar Search for Adsense Invalid Click Protector You May See This Picture.

Step Number 2=>
In Step 2, You will need to Download the Plugin, Click on the “Download” Button.
Step Number 3=>
In Step 3, Visit your Website, Go For “Dashboard” in the Dashboard you will need to Go For “Plugins”. In Plugins Page you may see “Add New” Option, Click on it.
After that, There will be “Upload Plugin” Button, I will Recommend you to Click on Button. Then you may See “Browse” Option-Click on it. The New Window will Appear in the Screen, Choose the Plugin that you have Download Before.

Step Number 3=>
In Step 3, You will need to Click on “Install Now” Button, After that Click on “Activate Plugin” Option.
Step Number 4=>
In Step 4, In the Menu Bar, you may see the Option “Google Adsense Invalid Click Protector” Click on it. Go for “General Settings”.

Step Number 5=>
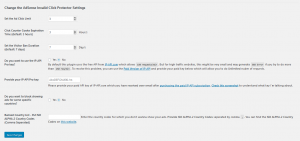
In Step 5, In General Settings, If you are going to change the Settings, You can Change the Settings.
Set the Ad Click Limit: This is one the Best Feature in this Plugin, You Can Set the User that how Many Time he Can Click on the Ads.
Click Counter Cooke Expiration Time(Default: 3Hours): In This Feature, you can set the Cooke Expiration By Default it is 3 Hours But If you want you can set as 4,5,6,7,8,10.
Set the Visitor Ban Duration (Default: 7Days): In this Feature, you Ban the User for Days Such as 1,2,3,4,5,6,7 ETC. But by Default, it is 7 Days.
Do you want to use the IP-API Pro Key? : If you want to Use IP-API Pro Key Then Click on “Yes” Button. Actually, Pro Key is Paid. If your Website Trafic A lot then you must Use Paid Version.
Provide Your IP-API Pro Key: IF You are going to Use Paid Version then enter the Pro Key Over here.
Do You Want to Block Showing Ads For Some Specific Countries? If you are Going to Block Some Specific Countries then Click on “Yes” Button.
Banned Country List- Put ISO ALPHA-2 Country Codes (Comma Separated): If you are going to Ban Some Countries then you will need to Click on This Website. There will A lot of Country, If you are going to Ban the Country then Copy the ALPA-2 Codes And enter it on the Form.
If you are Going to Ban 3 OR 4 countries Then you will need to Enter the Comma After One Country Code.
Read Also:Google AdSense Payment Delay Issue of November 2018


